



Fascia Box End Construction - Full Instructions
One of the questions we get asked the most by our customers is how to make a fascia box end. The box end is the part of the roofline on a property where gable joins the fascia, and where the barge board intersects with the fascia. It’s best to construct and fit a box end after the fascia and soffit boards have been installed.
This video provides a brief overview of how box ends are made, and we have also created a full detailed guide with illustrations below.
Step 1: Cutting the Return to Gable Board
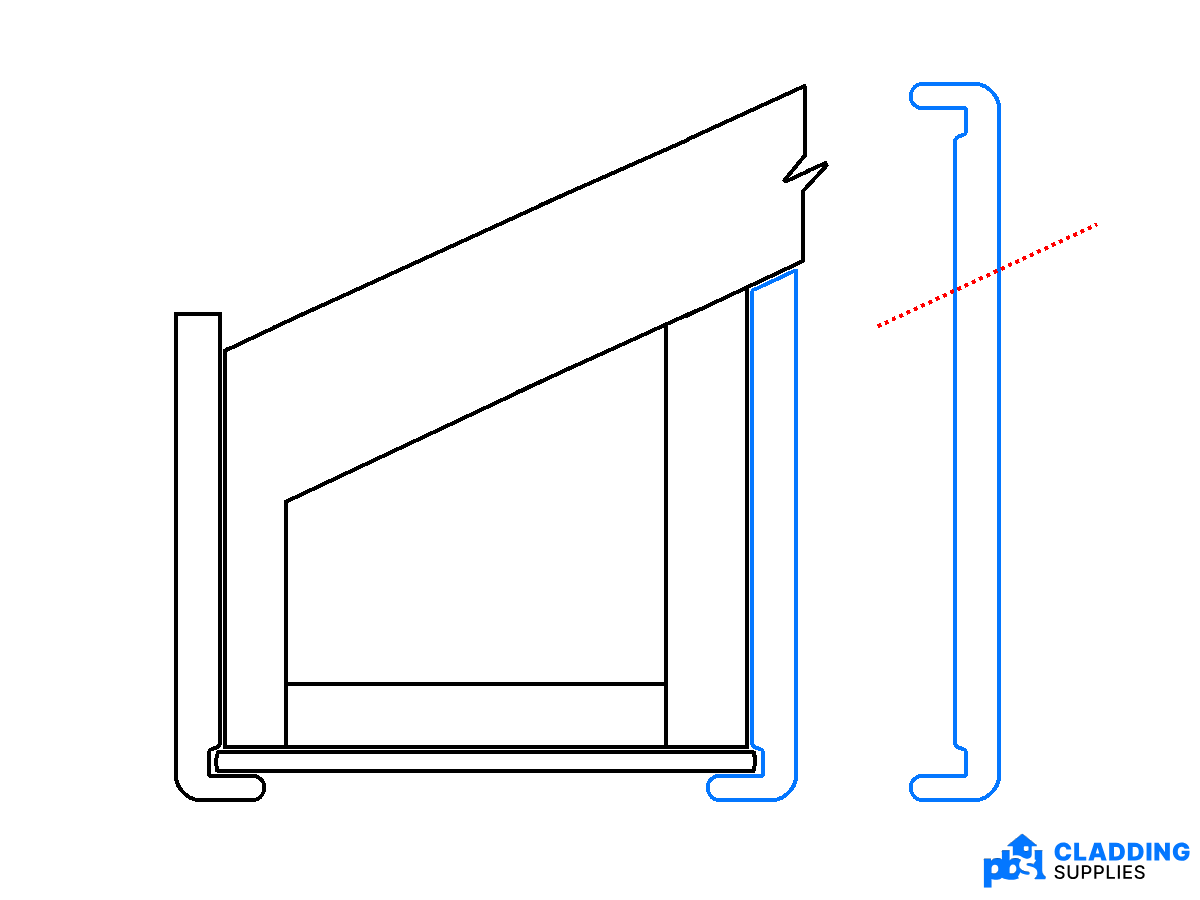 To begin, cut a small piece of fascia board that will seal the return between the box end and the front wall of the property that is beneath the gables. We’ll call this the return to gable board.
The width of this board is determined by the distance between the end of the run of soffit and the wall of the property. This should be cut from a box end board to ensure it is high enough. Box end boards are 1.25mtr long fascia boards that are 404mm wide, much wider than regular fascia boards.
- Hook it onto the soffit, on the opposite side to your fascia, in the same way you attached the fascia to the soffit.
- From here you can see where the board meets the bottom of the gable board, so mark this with a line and then cut the board, so that it can slot onto the soffit board via the leg and slide underneath the gable.
- Now use plastic-headed nails to fix it to the underside of the gable.
For reference, see figure 1 to the right, which is a diagram of the roofline from the perspective of looking at the gables head-on. The blue board is the box end board which is cut to become the return to gable board.
Step 2: Measuring and Cutting the Box End Board
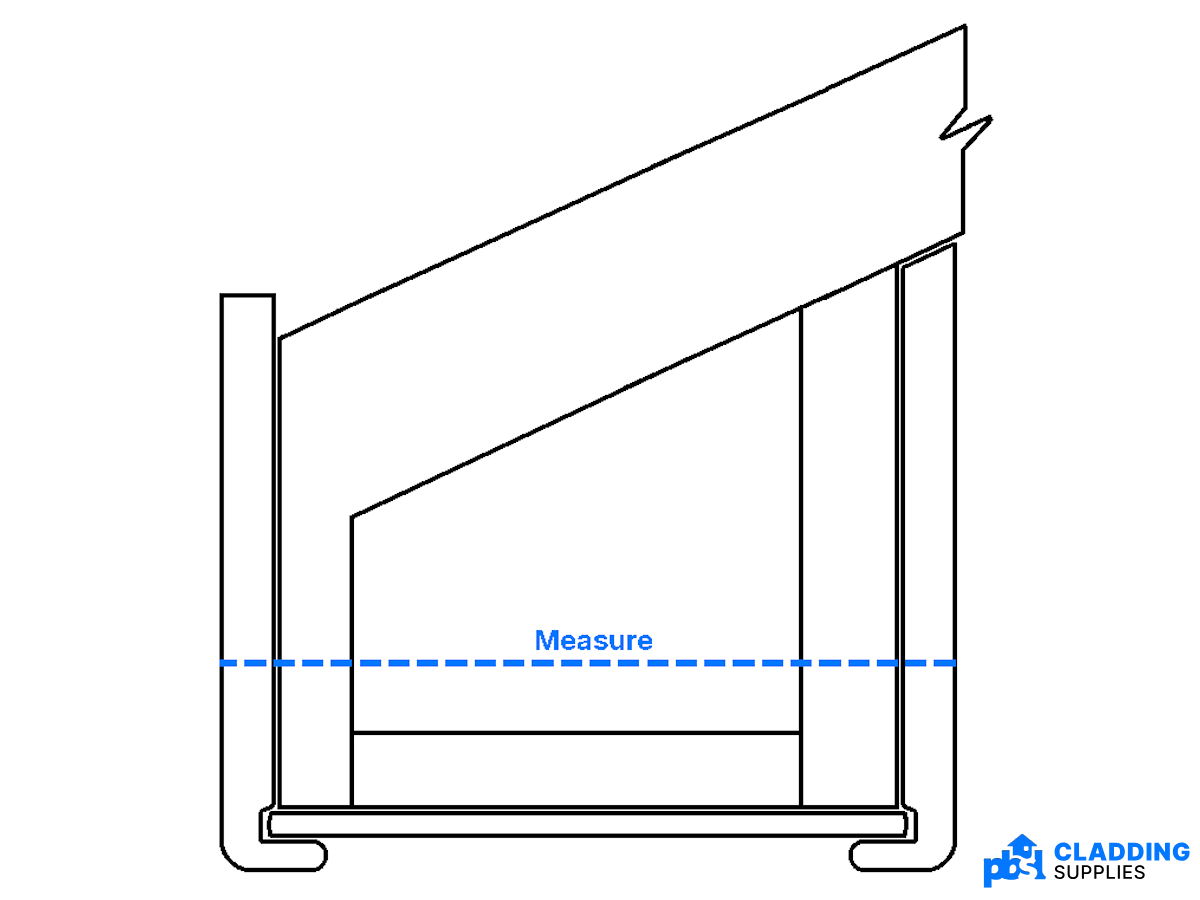 Measure the distance from the outside of the fascia board that runs along the side of the property to the outside of the return to gable board.
This will be the height of your box end board that is seen from the front of the property. So take a 1.25mtr x 404mm wide fascia / box end board, and cut a section off of it as wide as your height measurement.
See figure 2, where the blue line is the distance that should be measured for this board.
Step 3: Adjusting the Bottom Lip of the Box End Board to Fit
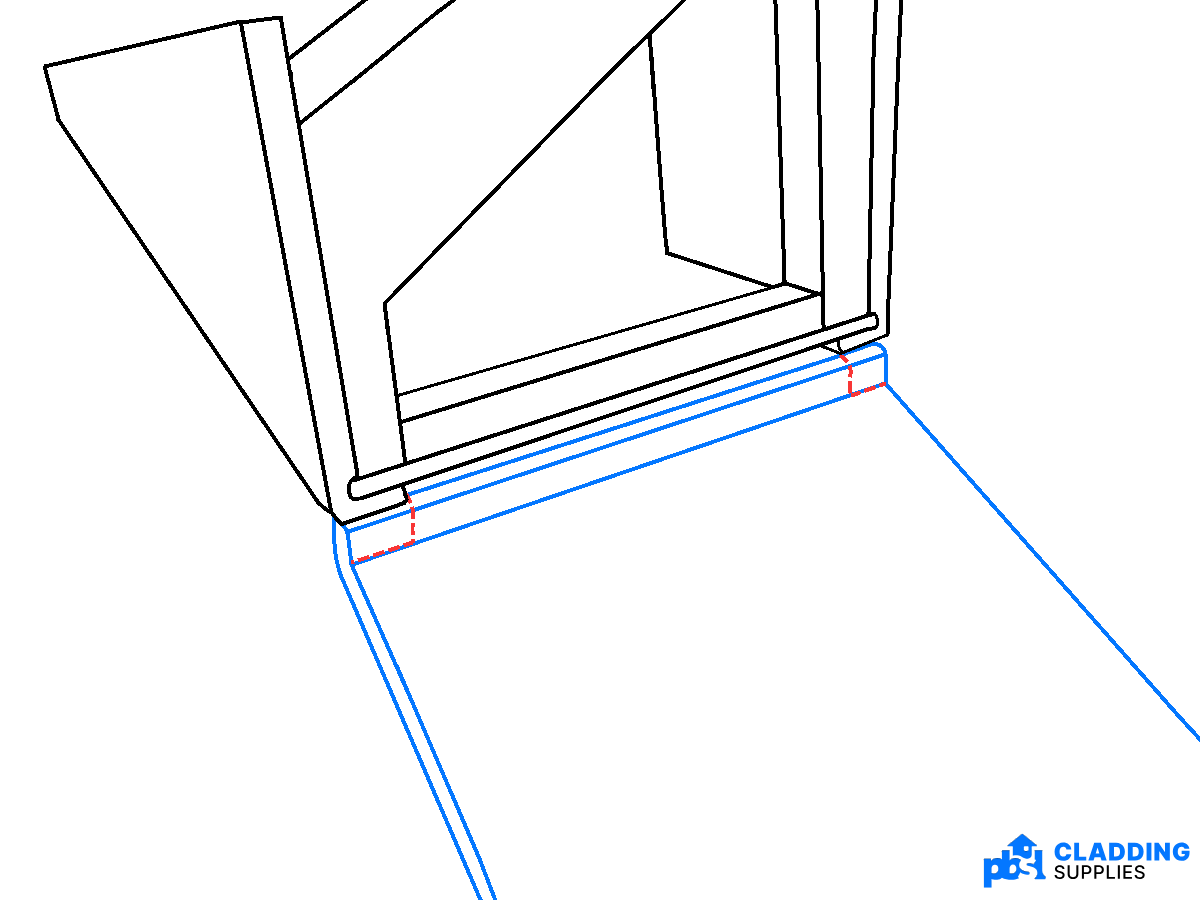 Hold your newly cut box end board up to where it is going to be fitted and notice where the bottom lip of the board meets the end of the soffit, fascia and return to gable boards.
In order for your box end board to fit properly, you will need to cut off two small pieces of the bottom lip at the edges.
This is so that the board's bottom lip isn't prevented from sliding underneath the end of the soffit board by the return legs of the fascia and return to gable board.
So hold the box end board up, tilt it towards you, mark on the bottom lip of the board where the return legs of the fascia and return to gable board end, and then cut them off of the box end board using a handsaw.
See figure 3, where the box end board (blue) is tilted downwards after being held where it is going to be fitted. Note the dotted red lines on the lip of the board that, outlining sections that should be cut off.
Step 4: Shaping the Box End Board
 Now hold your cut box end board up to where it is going to be fitted again, but this time it should be able to fit flush with the gable of the property now that the bottom lip has been adjusted.
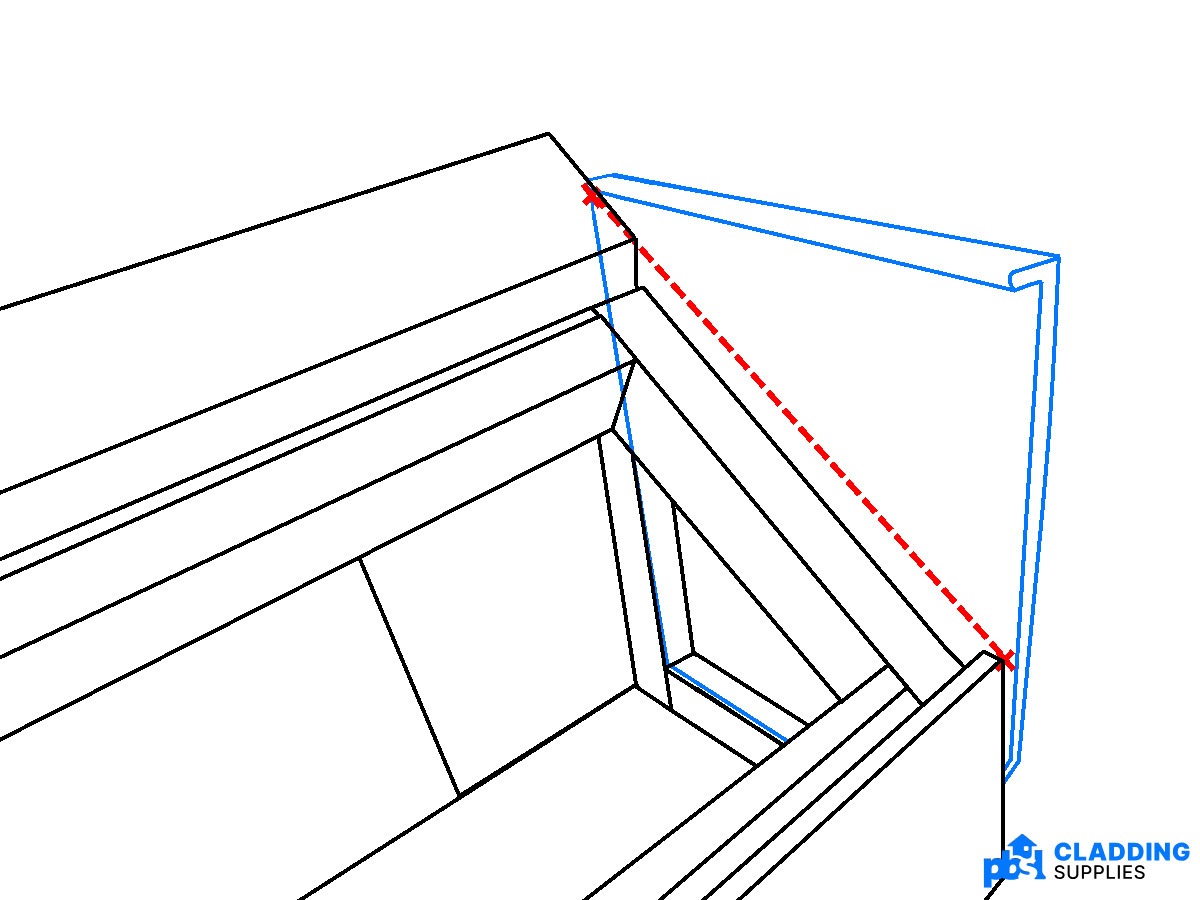
From here, reach over to the back of the board with a pencil and mark where the outer edge of the board meets the top of the fascia board. Make a second mark where the top of the board meets the rafter of the roof.
Figure 4 shows the box end from the opposite side to figure 3. The blue board is the box end board, the red x’s and the dotted line are the points you should mark whilst the board is held in place, and the line drawn between them is where you will need to cut the board.
Using a ruler, connect the two marks you have just made on the board with a straight line. Then cut along the line with a handsaw; the larger cut piece will be your box end board.
Step 5: Fixing the Box End Board with Nails
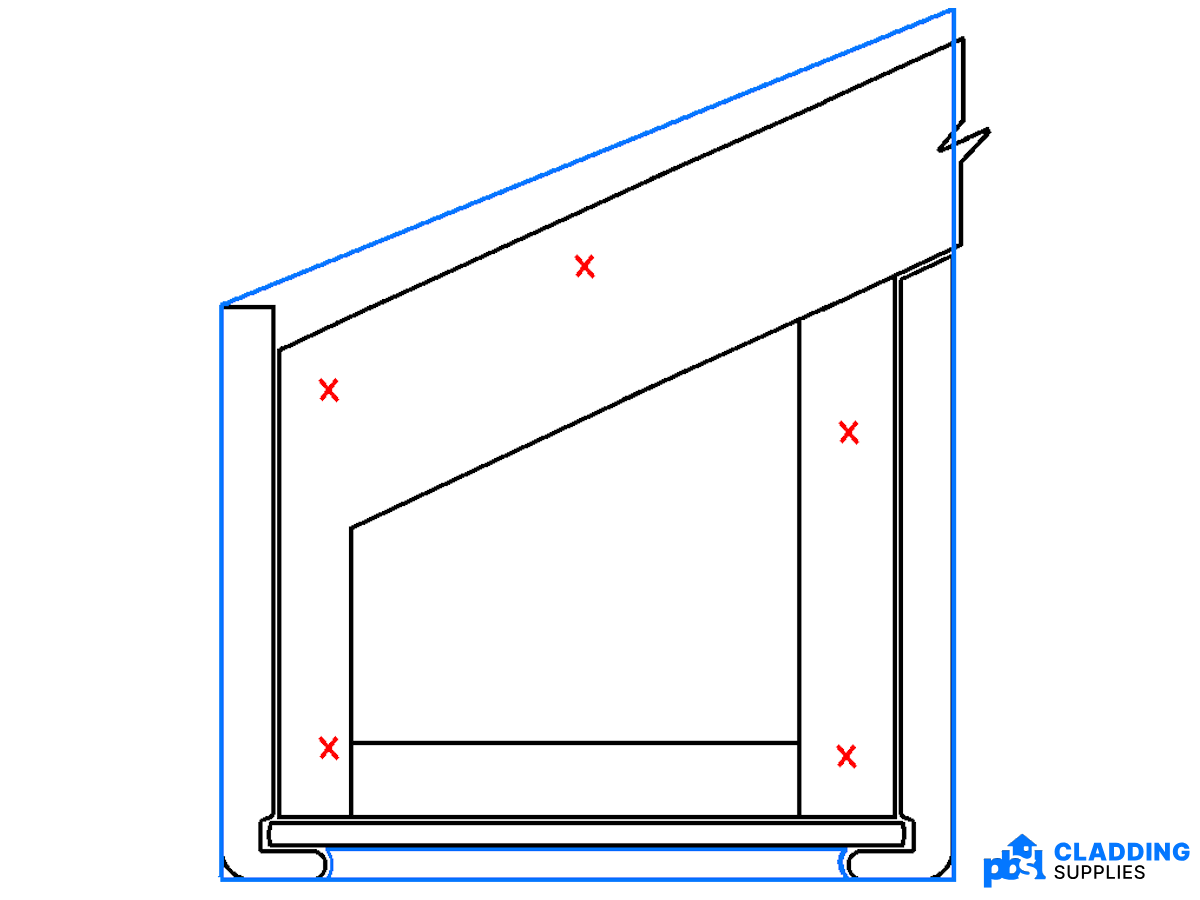 Before you begin to fit the board, you should first pre-pin two poly top nails on either end of the board, so that they line up with the vertical timber battens on either side of the fascia and return to gable board.
You can then slot the board into place and hammer the plastic-headed nails into the timber beneath to secure the board into place.
Figure 5 shows the original head-on view of the property, this time with the cut box end board held in position. The red x’s mark where the fixings should be placed and hammered in on the box end board.
Step 6: Cutting and Fitting the Outer Corner Trim
 Now that the board is held in place with nails, it needs to be fully secured, which can be done with two cuts of a fascia corner trim.
- Take a fascia corner trim and line the bottom end of the trim up with the outer corner of the box end.
- Now mark a line with a pencil on the inside of the corner trim where the top of the box end board runs into the corner, and where the fascia board meets the box end board on the other side.
- Cut the corner trim along this line to get it down to size, before holding it back in place.
To fix the corner trim in place, the most common method is to use silicone sealant on both sides of the corner, but superglue can also be used if applied with an activator on one side of the corner to allow for expansion and contraction.
Alternatively, you can use four small plastic-headed nails, two on each side of the corner trim, and hammer them in to secure the trim in place, but the silicone sealant and glue methods provide a neater finish as there are no fixings visible on the exterior.
Figure 6 shows a double ended fascia corner trim in red (not to scale) in place to cover the outer corner of the fascia box end. The excess of the corner trim can be cut off, the dotted red line in figure 6 shows where the cut should be made.
At this point, the bargeboards should be fitted on the property before proceeding to step 7. For more information on this, please see our full roofline installation guide.
Step 7: Cutting and Fitting the Inner Corner Trim
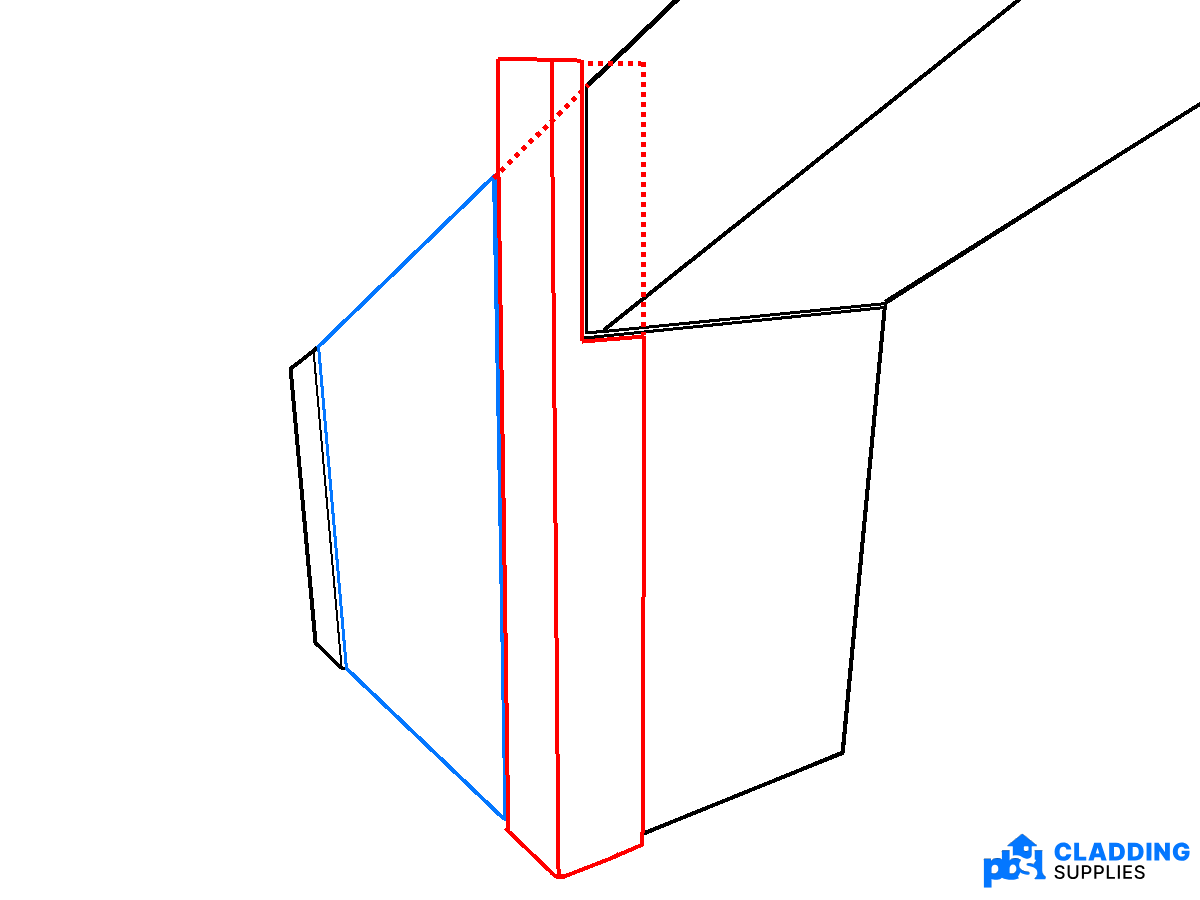 Take a second fascia corner trim, or the off-cut of the corner trim you just used if it is long enough, and do the same on the opposite corner of the box end. Line the trim up in the corner and mark it where it meets the underside of the gable.
Then draw a vertical line up the trim, the line should be going up from the previous horizontal mark and should be 18mm from the corner end.
These lines will show you where to cut the end of the trim to get it to the correct length, as well as give you an L shape to cut out at the top of the trim, so that it can fit in place with the bottom half fitting underneath the gable and the top half alongside it.
Figure 7 to the right shows the inner corner trim in place, with the red dotted lines marking the parts of the trim that need to be removed for it to fit smoothly under the gables.
You can then secure the trim using the same method from step 6 of this guide.
We hope that you found this guide useful and informative, but if you require any further assistance with your roofline installation, please don't hesitate to get in contact with our friendly team of experts. If you are in need of products for your projects, we can offer everything you need in a wide variety of colours, including:
Items you will need
-
- 410mm Black Smooth Fascia Capping Board Double Ended Box End - 10mm x 1.25mtr

- Code F410PBL1.25
£22.11 £26.53 - 410mm Storm Grey Smooth Fascia Capping Board Double Ended - 10mm x 1.25mtr

- Code FB410PSG
£22.11 £26.53 -
-
-
-
-
-
-
- 400mm Anthracite Grey Woodgrain Fascia Capping Box End Board - 10mm x 1.25mtr
![400mm Anthracite Grey Woodgrain Fascia Capping Box End Board - 10mm x 1.25mtr]()
- Code FW400WGAG.125
£29.96 £35.95 - 400mm Black Ash Woodgrain Fascia Capping Box End Board - 10mm x 1.25mtr
![400mm Black Ash Woodgrain Fascia Capping Box End Board - 10mm x 1.25mtr]()
- Code FW400WGB.125
£29.96 £35.95